You must Sign-in or Register to post messages in the Hobby Squawk community
Registration is FREE and only takes a few moments

Register now

Announcement

Collapse
No announcement yet.

Official FlightLine F4U-1A Corsair 1600mm (63") Wingspan

Collapse
X
Collapse
First Prev Next Last
 
  • Filter
  • Time
  • Show
Clear All
new posts

  • For those of you exploring the use of the "salmon" colored primer, you will find this of interest -- there's a birdcage F4U-1 being restored at the Naval Aviation Museum in Pensacola (an amazing, first-rate museum if you've never been). According to Dana Bell, the Navy called this "Indian Red" primer:

    It is now just over seven years since F4U-1 Corsair Bu.02465 rose to the surface of Lake Michigan following a retrieval effort sponsored by Chuck Greenhill.


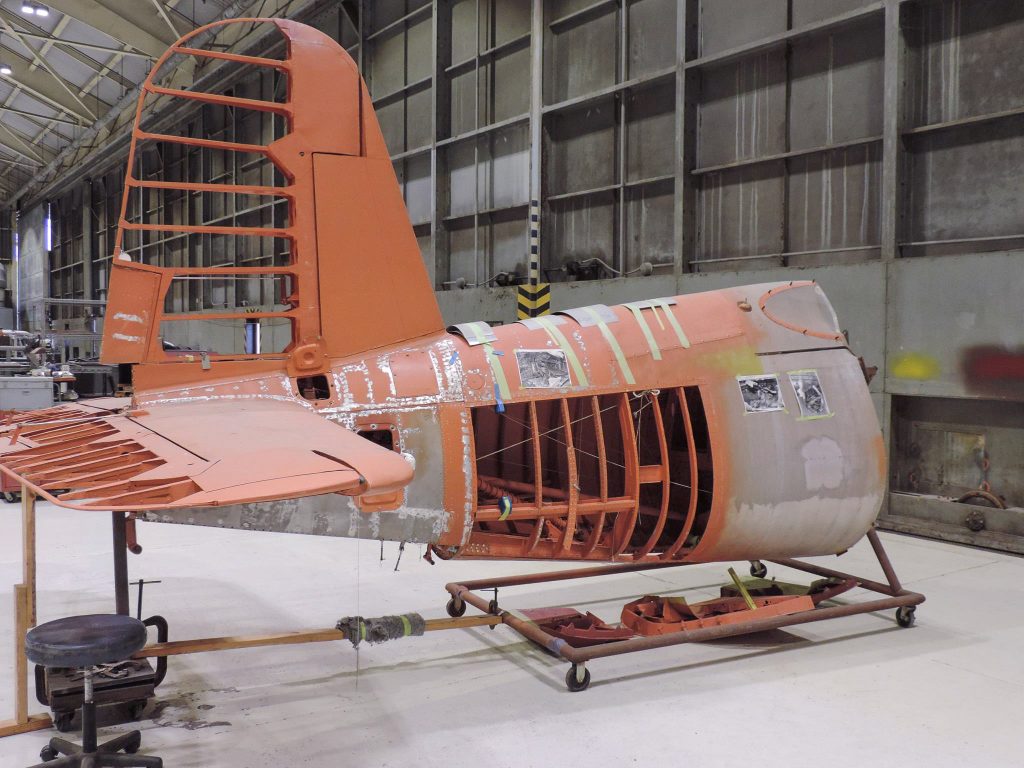
    What I don't have a clear picture of yet is this -- while there's no doubt early Corsairs used this color primer -- did it ever end up being "visible" (wheel wells, for example)? According Dana Bell's new book on birdcage corsairs, it would seem the most likely place to actually see Indian Red was, in all places, the cockpit. He says that "areas needing additional protection, such as wheel wells, were generally finished with Light Gray or (later) flat white."

    In any case, a cool article on what will end up being an amazing restoration -- as I recall, there are about five other aircraft on display that were restored right there, all salvaged from Lake Michigan, including Vought Vindicator (only surviving example), Wildcat, Hellcat, Corsair, and Dauntless.

    By the way, that website is WARBIRD DIGEST. If you haven't seen a copy on the newsstand, look for it -- it's a super-glossy in-depth magazine on warbird restorations. Not cheap, but first-rate.

    Comment


    • Those of you that have flown this plane so far, have you found that takeoff/landing is best on low rates vs high rates? Or is it more of getting a feel for the plane?
      Just trying to get all of my research in before taking her to the field, she's been sitting on the workbench for a few days now, getting her dialed in and triple checking everything, daily, until maiden day ;P

      Comment


      • Originally posted by sfmadmax View Post

        Nice Flying,

        My airfield is not as busy as yours, that seems like absolute madness, people flying different patterns on the strip :P
        I actually enjoy flying with others in the air.....however sometimes it takes the flight line themselves to get things back into order. New flyers just need a little instruction ....Eric's Ugly Stik and the Corsair were not actually that close...but what did surprise me was the speed of this Corsair.....it seems to excellerate in a shallow dive pretty quick....much faster than I had anticipated!!

        TwistedGrin

        Comment


        • Originally posted by RCAV8R View Post

          I am no expert, but I am so thankful to Alpha for inspiring me to dive in with my A-10. The first try I pre-shaded aggressively and then was too generous with the color coat and lost the distinction between shades. So I pre-shaded again (having to mask and dodge the decals) and now I under shot the color coat and need to come back and knock down the shades that are too apparent (this summer project). Post shading is what I want to learn more about now! The challenge is how things look in full sun as opposed to in the garage. But, I agree with LB, the great news is that more is better, and there is nothing to fear but fear itself! I look at everything with a much different perspective now...looking at the shades and asking myself how I would re-create that. Thank you SO MUCH Alpha for inspiring me to tackle this size of canvas and enjoying this aspect of your planes! Rob
          That's some really nice work there! Exactly what I was talking about...A few pics during the process and a few shots of the finished product. It's a big help and very inspiring!
          Thank You! :Cool:

          Comment


          • Originally posted by sethscorsair View Post
            https://youtu.be/5nPnlhZ8PTI

            Always do your pre flight checks ailerons were reversed on this poor bird.
            This was a sad sight to see.... Feel really bad for Ryan, hope he gets over his mistake and not to much damage to the plane.

            Rich

            Comment


            • I am assembling the gun sight on the instrument panel but I am not having any luck with the adhesives I’ve tried. What have you used that was successful… Anyone ?:Confused::Thinking::Silly:

              Comment


              • Originally posted by RichJ53 View Post
                This was a sad sight to see.... Feel really bad for Ryan, hope he gets over his mistake and not to much damage to the plane.
                Yeah a real bummer to happen to such a nice model. This is a great example that we are all susceptible to making rookie mistakes even if we have many years of experience under our belts. Complacency is a killer in this hobby. I am terribly guilty of that. You fall into your routines, get lazy, and BAM.

                Just the other day I douched my FlightLine P-51 into the cement at full throttle because I thought I could get away with a WOT under toss. Nope. Torque roll was too much, I couldn't recover in time. I knew it was risky but did it any ways. That is someone with 20+ years flight experience.

                The best way to approach this hobby is to respect it in every form, every moment and situation.

                Unless you don't mind bringing your several hundred dollar model home in a garbage bag. :Scared:
                My YouTube RC videos:
                https://www.youtube.com/@toddbreda

                Comment


                • I am doing that tonight, and I plan on trying Plastruct Bondene for ABS. It is a solvent base, like Acetone... Will advise!! You can get it from HobbyLinc, or Micromark, or Megahobbies… places like that. Tower Hobbies may even have it... :Cool:

                  Comment


                  • Originally posted by MrSmoothie View Post


                    Ole-Timer, not only a clever idea, but really nice execution -- my question -- these grommets appear to be sized by the hole, not the overall outside diameter. Did you use 3/8" grommets (which would be around 1/2" O.D.)? I may give this a try!
                    Hey Smoothie,

                    The grommets were 1/4 inch id and 11/16 od. They fit right into the factory hole with no modification of the hole. The metric measurement is 7mm id and 17.5mm od.
                    After I had made these and glued them in I found myself in need of some Testors paint and ended up at a craft store called Michael’s. They stocked some different types and sizes of grommets. Being a craft type store, the grommets they sell are geared for clothing type applications and there are indeed some variations on the theme to be had out there. I did like some of those better than this tarp style grommet. So you may want to shop around before you settle in on a particular choice.

                    You’ll like how it looks with this mod, OT :Cool:

                    Comment


                    • Originally posted by theoldALFER View Post
                      I am assembling the gun sight on the instrument panel but I am not having any luck with the adhesives I’ve tried. What have you used that was successful… Anyone ?:Confused::Thinking::Silly:
                      I used super glue at the advice of LB and it worked great. I’m hopeful it will still be there after 200 + landings!

                      Comment


                      • Thanks OT for that and the grommet data :Cool: :Goodbye:

                        Comment


                        • Hey guys, Sorry for the delayed reply.Thank you all for your kind comments. As for the pilot...he is from http://realmodelpilots.co.uk/epages/...ath=Categories

                          I used the 1:8 full body USA ETO pilot for this one

                          The cowl flaps are fixed and made from abs plastic

                          The radial motor is the FMS 1700mm Tiger cat radial with the stock original cylinder heads glued in behind to give the double row look

                          I'm working on a folding wing trial mod? still waiting to hear back from the email I sent Alpha

                          also adding working pylons for a bomb drop
                          Brandon Moon

                          Comment


                          • Brandon...could you share some detail on how you fabricated those cowl flaps? Rob

                            Comment


                            • Originally posted by theoldALFER View Post
                              Thanks OT for that and the grommet data :Cool: :Goodbye:
                              The solvent based Bondene was slow to soften the plastic, so a little thin Pro CA fixed it right up... :Cool:

                              Comment


                              • Originally posted by theoldALFER View Post
                                I am assembling the gun sight on the instrument panel but I am not having any luck with the adhesives I’ve tried. What have you used that was successful… Anyone ?:Confused::Thinking::Silly:
                                I sanded the bottom of the Gunsight and the Top of the Dash where the gunsight sits, to make the surface abrasive, then used some CA and set it in place. It's not going anywhere and def should hold up against bumpy landings.

                                Comment


                                • Originally posted by Brandon Moon View Post
                                  Hey guys, Sorry for the delayed reply.Thank you all for your kind comments. As for the pilot...he is from http://realmodelpilots.co.uk/epages/...ath=Categories

                                  I used the 1:8 full body USA ETO pilot for this one

                                  The cowl flaps are fixed and made from abs plastic

                                  The radial motor is the FMS 1700mm Tiger cat radial with the stock original cylinder heads glued in behind to give the double row look

                                  I'm working on a folding wing trial mod? still waiting to hear back from the email I sent Alpha

                                  also adding working pylons for a bomb drop
                                  Sounds like you have a'lot of work lined up Brandon, looking forward to seeing what you come up with, I for one am also interested in a working bomb release mechanism, the bottom of the plane has a plastic window already gives you a great place to access the electronics and figure it out.

                                  Comment


                                  • Originally posted by RCAV8R View Post
                                    Brandon...could you share some detail on how you fabricated those cowl flaps? Rob
                                    They are basically just simple ABS plastic that I cut and rounded and glued to the sides of the fuselage along the panel line
                                    Brandon Moon

                                    Comment


                                    • Anything holding them away from the fuse? And what about the nose art...I don't see anything like that from Callie? It's gorgeous! Rob

                                      Comment


                                      • Originally posted by Brandon Moon View Post
                                        Hey guys, Sorry for the delayed reply.Thank you all for your kind comments. As for the pilot...he is from http://realmodelpilots.co.uk/epages/...ath=Categories

                                        I used the 1:8 full body USA ETO pilot for this one

                                        The cowl flaps are fixed and made from abs plastic

                                        The radial motor is the FMS 1700mm Tiger cat radial with the stock original cylinder heads glued in behind to give the double row look

                                        I'm working on a folding wing trial mod? still waiting to hear back from the email I sent Alpha

                                        also adding working pylons for a bomb drop
                                        Hey Brandon, all of that sounds really cool! I am particularly interested in the folding wing mechanism. As I'm sure you know, Blitzworks did one for their Corsair of similar size but it seemed pretty sketchy, as all their stuff usually is.:Straight-Face:

                                        Comment


                                        • Originally posted by RCAV8R View Post
                                          Anything holding them away from the fuse? And what about the nose art...I don't see anything like that from Callie? It's gorgeous! Rob
                                          The decal is from a set of many nose art girls I sent to callie last year and hhad her make them up in several sizes for me. I had her make about 20 different nose art girls for me from my own personal collection.....some that I cant display on public forum ;(

                                          as for the cowl flaps.....they are simply angled outward and held in place by the foam tac glue with a big bead of the foam tac glue underneith them at the base.
                                          Brandon Moon

                                          Comment

                                          Working...
                                          X