P-38 - The Ultimate EPO Lightning

You must Sign-in or Register to post messages in the Hobby Squawk community
Registration is FREE and only takes a few moments

Register now

Announcement

Collapse
No announcement yet.

Freewing 90mm F-22 Raptor - Official Thread

Collapse
X
Collapse
First Prev Next Last
 
  • Filter
  • Time
  • Show
Clear All
new posts

  • Originally posted by WAY BAD View Post
    Here's Steve's (RCJetDude), he just fnished TV on his.

    https://youtu.be/Pn7YuqLgYZ4?t=2
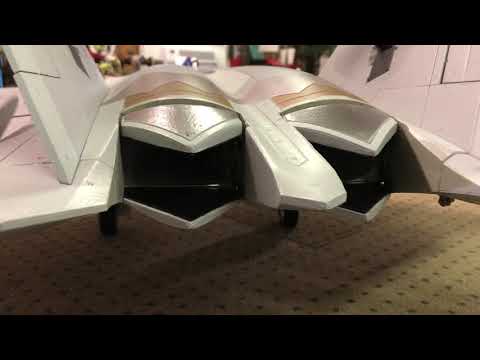
    Really amazing flight Steve, wouldn't have expected to see that in an EDF. More like what you would expect from some 3d park flyer. Very cool all the way around. Would like to see the linkage between top and bottom vector petals. Maybe George can do a follow up set of pics for his vectoring assembly.

    Comment


    • I posted pics of mine a ways back, ball links.

      Comment


      • Thanks to Evan D for his help as I was able to program tailerons. I also added some floods to the main gear. So, opening canopy, wingtip lights and strobes, RC Geek center-burner, Jeremy Solt's slime lights, mains floods, 3D printed cockpit parts and thrust vectoring. I am done....

        Comment


        • You’re going to like those as well as the TV’s! :)

          Comment


          • Very cool Steve and yes I saw your ball link setup Evan D but Steve used a different linkage than yours that was less obtrusive. That's why I was asking. Many thanks to you by the way for being the pioneer of this mod. Hoping to try it myself when I get the plane.

            Comment


            • I just used the standard ball links used on Freewing planes. Drilled holes in the tab on each plate to thread the ball link screw into then clipped off the excess on the back side. Filed it down a bit and hit it with a spot of glue to help secure it. The links themselves have to be cut shorter but just secure to the threaded end of a pushrod that I snipped off.

              Click image for larger version

Name:	IMG_20190102_211511.jpg
Views:	1094
Size:	33.4 KB
ID:	170028

              Click image for larger version

Name:	IMG_20190102_211522.jpg
Views:	1110
Size:	130.1 KB
ID:	170029

              Comment


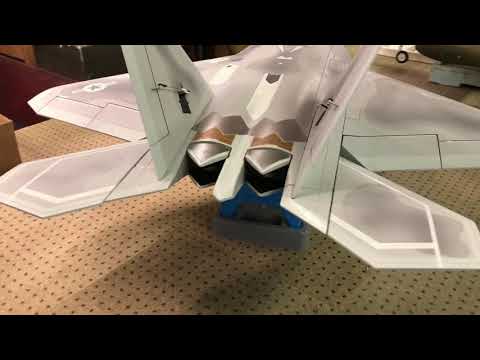
              • More pictures of the continuing TV saga:Silly:

                Click image for larger version

Name:	20190102_185118844_iOS.jpg
Views:	1157
Size:	170.0 KB
ID:	170042

                Click image for larger version

Name:	20190102_185158253_iOS.jpg
Views:	1102
Size:	108.9 KB
ID:	170041

                Click image for larger version

Name:	20190102_212012318_iOS.jpg
Views:	1091
Size:	79.2 KB
ID:	170036

                Click image for larger version

Name:	20190102_190829540_iOS.jpg
Views:	1101
Size:	80.1 KB
ID:	170035

                Click image for larger version

Name:	20190102_190806204_iOS.jpg
Views:	1085
Size:	83.1 KB
ID:	170034

                Click image for larger version

Name:	20190102_191026960_iOS.jpg
Views:	1082
Size:	66.3 KB
ID:	170033

                Click image for larger version

Name:	20190102_213050938_iOS.jpg
Views:	1079
Size:	109.2 KB
ID:	170040

                Click image for larger version

Name:	20190102_213406447_iOS.jpg
Views:	1160
Size:	98.4 KB
ID:	170039

                Click image for larger version

Name:	20190102_213353183_iOS.jpg
Views:	1145
Size:	91.7 KB
ID:	170038

                Click image for larger version

Name:	20190102_212025958_iOS.jpg
Views:	1074
Size:	86.8 KB
ID:	170037
                TiredIron Aviation
                Tired Iron Military Vehicles

                Comment


                • Click image for larger version

Name:	20190102_220942621_iOS.jpg
Views:	1143
Size:	181.2 KB
ID:	170064

                  TiredIron Aviation
                  Tired Iron Military Vehicles

                  Comment


                  • Well done!

                    Comment


                    • Originally posted by RCjetdude View Post
                      Thanks to Evan D for his help as I was able to program tailerons. I also added some floods to the main gear. So, opening canopy, wingtip lights and strobes, RC Geek center-burner, Jeremy Solt's slime lights, mains floods, 3D printed cockpit parts and thrust vectoring. I am done....

                      Steve,

                      What did you use as floods for main gear? Wired to MCB or separate power/activation system?
                      Freewing A10, F4, F22, Sebart Avanti S mini

                      Comment


                      • Originally posted by john2kx View Post

                        Steve,

                        What did you use as floods for main gear? Wired to MCB or separate power/activation system?
                        I got some white 1W LED's off of eBay, made some 3D printed mounts for them which I then just glued to the gear doors. I made a three to one harness and just plugged the nose strut light and two main strut lights into the take off light spot on the MCB-E. I then recessed the foam in the wing where the light fit when the gear was retracted. I think Pat did something similar on his.

                        Click image for larger version  Name:	IMG_20190102_220251.jpg Views:	1 Size:	221.1 KB ID:	170061

                        Click image for larger version  Name:	IMG_20190102_215306.jpg Views:	1 Size:	171.6 KB ID:	170055

                        Click image for larger version  Name:	IMG_20190102_215314.jpg Views:	1 Size:	169.0 KB ID:	170056

                        Click image for larger version  Name:	IMG_20190102_215320.jpg Views:	1 Size:	139.4 KB ID:	170057

                        Comment


                        • Steve your F-22 is pimpin' brother! Love it!! :Cool:
                          My YouTube RC videos:
                          https://www.youtube.com/@toddbreda

                          Comment


                          • Thanks for the detailed description and pics Steve!!
                            Freewing A10, F4, F22, Sebart Avanti S mini

                            Comment


                            • From today https://youtu.be/tSDq7KmIaaM

                              Comment


                              • So George, love all the pictures of the TV. Just one question, what is the second rod going across the whole thing. Is that just for longitudinal stability with the torque rods crimped together inside the tubes?

                                Comment


                                • Originally posted by downwindleg View Post
                                  So George, love all the pictures of the TV. Just one question, what is the second rod going across the whole thing. Is that just for longitudinal stability with the torque rods crimped together inside the tubes?
                                  Yes sir ;)
                                  TiredIron Aviation
                                  Tired Iron Military Vehicles

                                  Comment


                                  • I think I'm finished...maybe;)

                                    TiredIron Aviation
                                    Tired Iron Military Vehicles

                                    Comment


                                    • I like it. On mine my flaps move less that yours in proportion to the ailerons. The full span ailerons and tailerons produce a really high roll rate. I have a elevator to flap mix with Up elevator causing down flaps. This is not working as well as it does on other planes I have and I think the next flights out I'll reverse that and if still not effective turn it off.

                                      I like the triple flash on the top of the fuse and have been back and forth on if I want one.

                                      Great job!

                                      Comment


                                      • Originally posted by john2kx View Post

                                        Did you do this to all three gear? About to soften mine up as well.

                                        John
                                        I tried the softer springs and they were just too soft, Wouldn't hold the plane up. I then followed your measurements and you hit the nail on the head. Just much better. Thanks

                                        Comment


                                        • I wanted to give TiredironGRB credit for cutting down the springs. Worked very well. Much better.

                                          Comment

                                          Working...
                                          X