Looks Amazing!!!!!!
I want to learn this technique!!!
Thanks!
It's actually pretty simple to do.
Tools:
Soft Charcoal Pencil
Short-bristle detail brush
Xacto or hobby knife
(see descriptions on pics)
All I do is use the knife to make a flat head screwdriver type shape with the pencil lead. Then I draw in the panel line with the charcoal pencil, shaving down the point again as needed. Once they are drawn in, I take the detail brush and rub it back and forth through the panel lines to smooth out the charcoal and give it a softer edge. Finally I spray the entire plane with Testors Dullcote or Rustoleum 2X Matte.
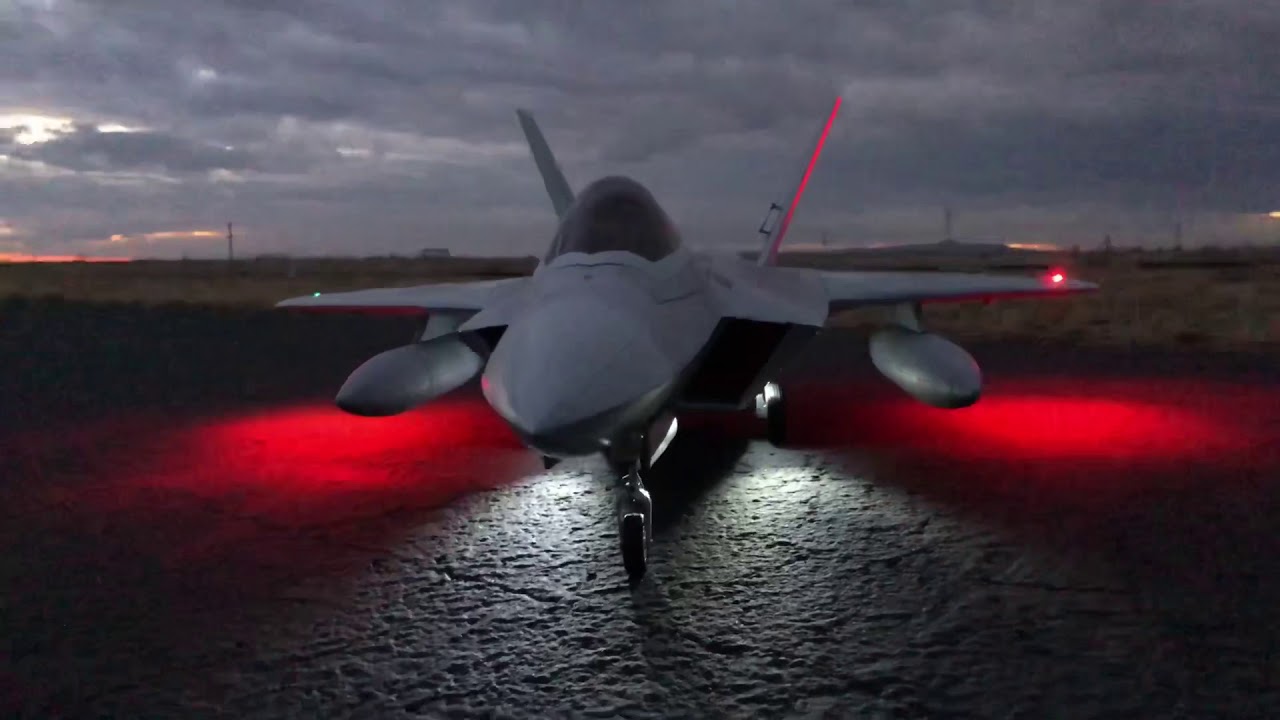
I finally quit flying her long enough to put the lights on.
For the lenses, I carefully cut out the rhombus shape. Then overlaid the light lenses from the Flightline P-38. Trimmed off the excess on both sides and squared the ends. Sheet styrene triangles added to both ends, and support tabs added to bottom to glue all 3 pieces together. Masked off the light bubble, Rustoleum filling primer and carefully glued in from underneath with Foamtac. (The Rustoleum filling primer is also a close match for the rudder servos, mask off with sticky notes)
To run the lighting wires I removed the aileron servo from its pocket, pulled the wire out back to the circuit board, and unscrewed the wing circuit board. I deepend the hole with a flat blade screw driver, then cut a foam channel most of the way from the aileron servo pocket to the rhombus. I plugged the upper and lower nav lights into the board, and the lower Nav lights only come on when the gear is down.
I added two two sets of Y’d wires from the Main control board to the Wing pocket with connectors at the wing pocket. I then ran a Red and a White light to each wingtip and reinstalled the aileron servo. The plugs for the red and white wire are left loose over the wing circuit board, then rescrewed that back into the wing root. White Strobes at the back upper half of the light blister, and respective nav lights at the front. Red lights at the back of each bottom blister, and respective nav lights on the front of each bottom.
My jet has dual upper strobes (White), upper and lower nav lights, as well as lower beacon (red) lights like the real F-22. I used the light kit from the Freewing F-14. The lower navs are only on when the gear is down.
I also added 2 lights to the main gear to aid with orientation on post sunset landings. With just the nose light, it is so bright you can glare over the aircraft shape and lose orientation.
Cutting out rhombus shape. I started out initially seeing if I could just stick the lense blister through the foam, then decided to remove the entire rhombus shaped area.
Soldered another light onto each wing light in parallel for top and bottom lights. Used a dab of epoxy to seal surface of each light. Once epoxy is applied I...
I finally quit flying her long enough to put the lights on.
For the lenses, I carefully cut out the rhombus shape. Then overlaid the light lenses from the Flightline P-38. Trimmed off the excess on both sides and squared the ends. Sheet styrene triangles added to both ends, and support tabs added to bottom to glue all 3 pieces together. Masked off the light bubble, Rustoleum filling primer and carefully glued in from underneath with Foamtac. (The Rustoleum filling primer is also a close match for the rudder servos, mask off with sticky notes)
To run the lighting wires I removed the aileron servo from its pocket, pulled the wire out back to the circuit board, and unscrewed the wing circuit board. I deepend the hole with a flat blade screw driver, then cut a foam channel most of the way from the aileron servo pocket to the rhombus. I plugged the upper and lower nav lights into the board, and the lower Nav lights only come on when the gear is down.
I added two two sets of Y’d wires from the Main control board to the Wing pocket with connectors at the wing pocket. I then ran a Red and a White light to each wingtip and reinstalled the aileron servo. The plugs for the red and white wire are left loose over the wing circuit board, then rescrewed that back into the wing root. White Strobes at the back upper half of the light blister, and respective nav lights at the front. Red lights at the back of each bottom blister, and respective nav lights on the front of each bottom.
My jet has dual upper strobes (White), upper and lower nav lights, as well as lower beacon (red) lights like the real F-22. I used the light kit from the Freewing F-14. The lower navs are only on when the gear is down.
I also added 2 lights to the main gear to aid with orientation on post sunset landings. With just the nose light, it is so bright you can glare over the aircraft shape and lose orientation.
The opening canopy mod is basically done and works pretty good. I will probably try some small magnets up front to help secure the canopy when closed and will report how that works. Here are a couple videos and a few pics of it.
[QUOTE=RCjetdude;n168084]The opening canopy mod is basically done and works pretty good. I will probably try some small magnets up front to help secure the canopy when closed and will report how that works. Here are a couple videos and a few pics of it.
As always, Very nice work there Steve! That's Awesome!:Cool:
IMHO you should only need 1 rare earth magnet at the front to hold it forgoing any added strain to the servo upon opening. ;)
Steve, as I just posted in the printed parts thread, wonderful job! I think an opening canopy deserves a full cockpit so I've made arms and legs for the 1/12 JHH pilot bust that I think you're also using. I picked up some Sculpey Ultralight sculpting clay at a Michael's store yesterday and I think the end result will be good enough once he's sanded, painted and strapped in. My Raptor's still in the box 'till the 25th- looking at photos I think (hope) there's room for his bottom half with the cockpit floor foam removed.
Tom
I have greased the landings on my F-22, but after the front wheel came off and plowed in the front gear mount is loose. I fly off dirt and I’m thinking about adding a gear strut brace like I’ve added to my Avanti. Anyone done the 3D file on this yet?
I have greased the landings on my F-22, but after the front wheel came off and plowed in the front gear mount is loose. I fly off dirt and I’m thinking about adding a gear strut brace like I’ve added to my Avanti. Anyone done the 3D file on this yet?
I added this to my Raptor just like my Avanti as a saftey measure.


Comment