Official Freewing Twin 80mm/90mm A-10 Thunderbolt II Thread

Collapse
X
Collapse
First Prev Next Last
 
  • Time
  • Show
Clear All
new posts
  • MikeT
    Here......Hold my beer.

    • Jan 2016
    • 1060
    • Send PM

    #11381
    Originally posted by DCORSAIR

    Mine came off as well, I just drilled two tiny holes, one at the top and one at the bottom then I put some tiny little screws to hold it on, never had an issue after that.
    I did the same.

    Mike
    \"When Inverted Down Is Up And Up Is Expensive\"

    Comment

    • motorc
      Member
      • Aug 2023
      • 11
      • Send PM

      #11382
      Any ideas on how to repair these wing anchors?

      Comment

      • MikeT
        Here......Hold my beer.

        • Jan 2016
        • 1060
        • Send PM

        #11383

        Click image for larger version

Name:	J-B-Weld-Original-Cold-Weld-Steel-Reinforced-Epoxy_f190029e-048f-4fbb-8c93-1279ecc26324.0c2b60c1e7e014b52749612f886899be.webp
Views:	0
Size:	0
ID:	383573
        I would just JB Weld them back together.

        Mike
        \"When Inverted Down Is Up And Up Is Expensive\"

        Comment

        • motorc
          Member
          • Aug 2023
          • 11
          • Send PM

          #11384
          Hey Mike, thanks for the input. I thought about just gluing the wings back together but I really like to take them off for transport so I'm saving that as a last resort. One thing I am considering but don't know if it will work is gluing the brass insert to the base of the anchor and then when that dries, make a form out of cardboard and pour JB weld into that, like pouring concrete into a form, and when that dries, sand off the cardboard and any rough areas. Not sure how strong that would be or if it would work.

          Comment

          • MikeT
            Here......Hold my beer.

            • Jan 2016
            • 1060
            • Send PM

            #11385
            I meant just using JB WELD to repair the broken ears using it to reassemble the tabs.

            Mike
            \"When Inverted Down Is Up And Up Is Expensive\"

            Comment

            • motorc
              Member
              • Aug 2023
              • 11
              • Send PM

              #11386
              unfortunately, the broken pieces are gone

              Comment

              • MikeT
                Here......Hold my beer.

                • Jan 2016
                • 1060
                • Send PM

                #11387
                Your running out of options than.

                Mike
                \"When Inverted Down Is Up And Up Is Expensive\"

                Comment

                • motorc
                  Member
                  • Aug 2023
                  • 11
                  • Send PM

                  #11388
                  another thought I had was to get the anchor pieces completely out of the wing and mill new ones out of wood and reinstall, but not sure if its possible to get them out of the wing without ruining the wing.

                  Comment

                  • Elbee
                    Be humble...be approachable...and be credible.

                    • Feb 2018
                    • 4816
                    • Wichita, Kansas
                    • Send PM

                    #11389
                    motorc,

                    Check the following link to Motion RC. Are these the parts you are looking for?

                    These are "In Stock", though the web-page says only 1 set left.

                    Buy Freewing 80mm EDF A-10 Plastic Parts Set B online at Motion RC. Order online with fast delivery.


                    Good Luck.

                    Best, LB


                    "I am having an extraordinary ordinary life."
                    ~Lucky B*st*rd~

                    "Find satisfaction in the process rather than an outcome."
                    ~Anonymous~

                    AMA#116446

                    Comment

                    • motorc
                      Member
                      • Aug 2023
                      • 11
                      • Send PM

                      #11390
                      Thats it! thanks LB

                      just ordered it.

                      Comment

                      • Elbee
                        Be humble...be approachable...and be credible.

                        • Feb 2018
                        • 4816
                        • Wichita, Kansas
                        • Send PM

                        #11391
                        Originally posted by motorc
                        Thats it! thanks LB just ordered it.
                        MC, you should be able to slice/cut through the plastic part avoiding cutting the foam the best you are able.

                        Do this as many times as needed in order to "pull' or "pry" off small pieces a bit at a time without damaging the foam underneath.

                        You'll be fine.

                        The glue can be pulled off with your fingers and mineral spirits will dissolve it enough to remove the residue.

                        Best, LB
                        "I am having an extraordinary ordinary life."
                        ~Lucky B*st*rd~

                        "Find satisfaction in the process rather than an outcome."
                        ~Anonymous~

                        AMA#116446

                        Comment

                        • motorc
                          Member
                          • Aug 2023
                          • 11
                          • Send PM

                          #11392
                          thanks LB, I thought I would try making small horizontal cuts in the plastic with a dremel set up with a cutting wheel, trying to be careful not to go too deep.

                          Comment

                          • Elbee
                            Be humble...be approachable...and be credible.

                            • Feb 2018
                            • 4816
                            • Wichita, Kansas
                            • Send PM

                            #11393
                            motorc, Yeppers, that is a good plan. In my experience with the adhesive, it will release fairly easily once you get started. Cleans up well. Best, LB
                            "I am having an extraordinary ordinary life."
                            ~Lucky B*st*rd~

                            "Find satisfaction in the process rather than an outcome."
                            ~Anonymous~

                            AMA#116446

                            Comment

                            • brrzee
                              Member

                              • Aug 2017
                              • 48
                              • Send PM

                              #11394
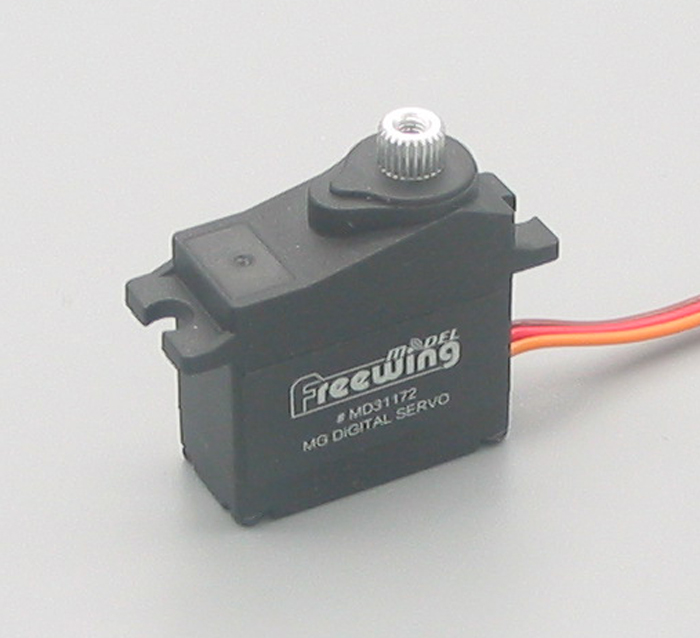
                              Hi there, could someone on this thread please post a pic of the gear door servo with servo arm attached setup..i had to replace the gear door after a bad land & cant remember how the arm goes on

                              Comment

                              • spcboarder
                                Member
                                • Jan 2023
                                • 7
                                • Send PM

                                #11395
                                Originally posted by xviper
                                You might want to get a couple and change both sides and keep the one good one as a spare.
                                Motion has that in stock in the USA. Perhaps you could pay a little extra to have a couple mailed to you. Or, you could get a couple of these from RC Castle:
                                freewing 17g metal gear servo with 100mm lead reverse servo freewing 17g metal gear servo with 100mm lead reverse freewing stinger 90mm edf jet freewing 17g metal gear servo with 100mm lead reverse freewing eurofighter 90mm edf jet freewing 17g metal gea

                                The lead is a bit short but I'm sure you could get a short extension.

                                If the above doesn't suit you, in that link you put up for the stock servo, you should have seen all the specs for it. From those specs, you should be able to get the same in any other brand. You mentioned HobbyKing. They also give specs for all their servos. However, if you are willing to go with HobbyKing, why not just go with the stock one from Motion.com or RC Castle?
                                Thank you for the good tips. A few weeks after my post Motion Europe got 6 (!) Servos back in stock so I ordered two immediately. A few days after I had the flap Servos installed, the other flap and aileron servos started shivering. I. The end I ordered a second time. Now all 6 Wing-Servos are replaced and the A-10 is still flying like a charm :)

                                Br, spcboarder

                                Comment

                                • mkudzia
                                  Member
                                  • Aug 2023
                                  • 1
                                  • Send PM

                                  #11396
                                  Finally after flying this model for a while and being comfortable with it got around and did the weathering.
                                  Now in the process of 3D printing in LW-ASA some high quality armament for the baby :)

                                  I love doing a nice wide turn into a long final approach maintaining a nice flare for a perfect landing :D

                                  Question: Did anybody manage to replace the led's on the model?

                                  On my scale helicopter builds and composite plane builds I am using a UniLight light system with very strong leds that are even well visible at daytime and look Fabolous in the evening.
                                  I am wondering how much effort would be to redo the leds?
                                  The big question mark is the wiring of the wings with the JST connector; which ones are LED ones and if they are on seperate ground? Click image for larger version  Name:	image.png Views:	0 Size:	1.13 MB ID:	384837 Click image for larger version  Name:	image.png Views:	0 Size:	971.6 KB ID:	384838 Click image for larger version  Name:	image.png Views:	0 Size:	1.21 MB ID:	384839 Click image for larger version  Name:	image.png Views:	0 Size:	1.56 MB ID:	384840 Click image for larger version  Name:	image.png Views:	0 Size:	1.39 MB ID:	384841

                                  ​​​
                                  Attached Files

                                  Comment

                                  • Elbee
                                    Be humble...be approachable...and be credible.

                                    • Feb 2018
                                    • 4816
                                    • Wichita, Kansas
                                    • Send PM

                                    #11397
                                    Originally posted by mkudzia
                                    which ones are LED ones and if they are on seperate ground?​​​
                                    MK, First, may I say Welcome to "The Squawk". Great to have you onboard, Sir.

                                    Secondly, It has been a while since I had mine apart, but if you'll look at the wing root, there's a plastic connector for the wing to fuselage electrics.

                                    It will unscrew from the plastic holder. Remove the Plastic holder and look at the Connectors.

                                    Any two (2) wire lead that is connected is an LED light.

                                    Hope this helps.

                                    Best, LB
                                    "I am having an extraordinary ordinary life."
                                    ~Lucky B*st*rd~

                                    "Find satisfaction in the process rather than an outcome."
                                    ~Anonymous~

                                    AMA#116446

                                    Comment

                                    • RAFALR30
                                      Member
                                      • May 2022
                                      • 35
                                      • POLAND
                                      • Send PM

                                      #11398
                                      Time to balance the model - to mount the speakers in the right place. Imagine that after disassembling the armament, the CG remains in the same place - applause for the manufacturer for the thoughtful placement of the pylons. There will be the sound of engines and cannon brrrttt :-)
                                      Attached Files

                                      Comment

                                      • Elbee
                                        Be humble...be approachable...and be credible.

                                        • Feb 2018
                                        • 4816
                                        • Wichita, Kansas
                                        • Send PM

                                        #11399
                                        RAFALR30, Outstanding work, SIr. Beautiful paint and realistic ordinance. Best, LB
                                        "I am having an extraordinary ordinary life."
                                        ~Lucky B*st*rd~

                                        "Find satisfaction in the process rather than an outcome."
                                        ~Anonymous~

                                        AMA#116446

                                        Comment

                                        • RAFALR30
                                          Member
                                          • May 2022
                                          • 35
                                          • POLAND
                                          • Send PM

                                          #11400
                                          Work completed .
                                          RTF weight 7kg - 7.4kg depending on weapon (3D print) configuration.​
                                          Attached Files

                                          Comment

                                          Working...