You must Sign-in or Register to post messages in the Hobby Squawk community
Registration is FREE and only takes a few moments

Register now

Announcement

Collapse
No announcement yet.

Official Freewing Twin 80mm/90mm A-10 Thunderbolt II Thread

Collapse
X
Collapse
First Prev Next Last
 
  • Filter
  • Time
  • Show
Clear All
new posts

  • Noticed my nose art is pealing off. Wondering if I did something wrong?

    Comment


    • Did you use the decal setting solution ?

      Comment


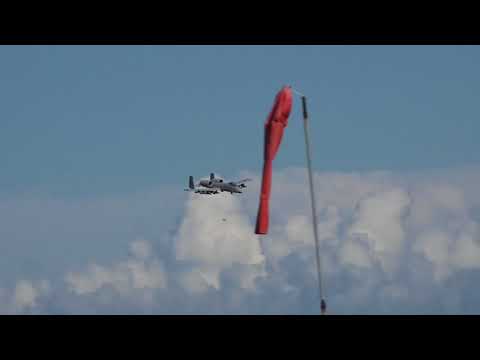
      • Shot this video of my buddy Steve's A-10 today. It's been edited to eliminate the bad "ridem' cowboy" landing. (Steve didn't want it uploaded to YouTube) Luckily it didn't do much to the plane and he few again. So I shot the landing from his 2nd flight and put it in place on this video


        My YouTube Videos https://www.youtube.com/channel/UCrz...4Q-xrOOtP2C-8w

        Comment


        • Nice vid. I like how he kept her close where we can see it.
          Currently flying: Twin 80mm A-10, 80mm F5, 80mm A6, 70mm Yak-130, 70mm F-16v2,90mm Stinger 90, 70mmRC Lander F9F, Flightline F7F TigerCat, Phoenix 46 size Tucano, Flyzone L-39
          Out of Service: 80mm Mig-21,64mm F-35, 64mm F/A-18
          I Want: 80mm A-4, twin 80mm F4J Phantom

          Comment


          • For those of you going with the "shocks on the main gear" mod on RCG I just posted over there on my take on it:
            Originally Posted by mattmanraptor
            The shocks are 85mm long, body is 12mm diameter, Pictured: TrackStar Aluminum Shock Absorber Set 85mm (2) S160085 HK
            The silicone oil used(3 weights),,,, Shock oil 100wt, Diff oil 500,00cSt and 1,000,000cSt
            some 4mm and 5mm brass tubing
            Bolts: a 3x14mm button head and a 4x16mm hex head
            a 3mm tap
            I've expanded on Matt's brilliant idea a bit in order to improve the geometry of the shock and hence it's function. The triangle created by the bracket allows full stroke of the shock and no spacers were needed for the install as it's more in line this way. The bracket is from 1.4mm aluminum I had on hand, mounted with 3mm machine screws. Not too much foam and retract mount plastic needs removing with this configuration. I used the same shocks Matt sourced (thanks again man!) and they're filled with the 5000 diff oil- the dampening action feels good but as I've yet to fly this mod we shall see. I've only 5 flights on my Hog, all good landings, but a slight trough in our grass field is launching it on the take off run prematurely, ass high, into the air and I'm hoping this will reduce that. Not to mention the inevitable bounced landing that will happen at some point....
            Tom

            Comment


            • That's cool! Is the stock spring still in there?

              Comment


              • Originally posted by Pete Lane View Post
                Did you use the decal setting solution ?
                nope just straight up water.

                Comment


                • Originally posted by Ryan@Motion/ryramZ View Post
                  That's cool! Is the stock spring still in there?
                  Hi Ryan- yes, the spring remains.
                  Tom

                  Comment


                  • Anyone do any mods to get the hot air away from the battery compartment? My batts are warmer then I like after my flight.
                    Thanks

                    Comment


                    • What bounce !

                      Comment


                      • Originally posted by Xtraflyr View Post
                        Anyone do any mods to get the hot air away from the battery compartment? My batts are warmer then I like after my flight.
                        Thanks
                        I took the nose gear door off and that really helped.
                        TiredIron Aviation
                        Tired Iron Military Vehicles

                        Comment


                        • Originally posted by Xtraflyr View Post
                          Anyone do any mods to get the hot air away from the battery compartment? My batts are warmer then I like after my flight.
                          Thanks
                          I noticed the same thing. I went into the "refuel port" at a downward angle with a sharpened 1/2" copper pipe, twisting slowly as you go. Then painted the inside with dark gray paint. Then I opened up the exit ports on the underside with a sharpened 3/4" copper pipe. Dropped battery temp by about 20 deg.

                          Comment


                          • Originally posted by Pete Lane View Post
                            Did you use the decal setting solution ?
                            I found that stuff to be a great help in my decal application. I recommend using both Solvaset and Microsol.

                            Mike
                            \"When Inverted Down Is Up And Up Is Expensive\"

                            Comment


                            • Click image for larger version

Name:	image_15204.jpg
Views:	538
Size:	111.1 KB
ID:	93504
                              Originally posted by Xtraflyr View Post
                              Anyone do any mods to get the hot air away from the battery compartment? My batts are warmer then I like after my flight.
                              Thanks
                              Air intake in the front and an exit hole on the left rear side of the plane for coolong.


                              Click image for larger version  Name:	Screenshot_2017-08-06-14-02-22.png Views:	2 Size:	579.6 KB ID:	93502Click image for larger version  Name:	Screenshot_2017-08-06-14-04-07.png Views:	2 Size:	471.9 KB ID:	93503
                              BVM Bandit, EFlite Carbon Z T-28, EFlite Carbon Z Cub, EFlite Promethus, FW Avanti S, FW A-10 ThunderBolt, FW P-51 Mustang, EFlite Convergance, EFlite Carbon Z Cessna 150, EFlite Habu, EFlite Styker Q-F27, HSD Navy Super Viper

                              Comment


                              • if anyone finds a perfect match for the gray paint on the A-10 please let me know where you got it and if there a code. I tried Lowe"s but they couldn't match it close enough for me to use it. too dark

                                Comment


                                • I went to Home Depot and the match was okay but slightly too light. Go figure. Someone here posted the codes with a pic. Said it was perfect. Might have to sift through the thread.

                                  Currently flying: Twin 80mm A-10, 80mm F5, 80mm A6, 70mm Yak-130, 70mm F-16v2,90mm Stinger 90, 70mmRC Lander F9F, Flightline F7F TigerCat, Phoenix 46 size Tucano, Flyzone L-39
                                  Out of Service: 80mm Mig-21,64mm F-35, 64mm F/A-18
                                  I Want: 80mm A-4, twin 80mm F4J Phantom

                                  Comment


                                  • I posted the paint match I got at Home Depot a few pages back. They are a very very close match in my opinion. :Cool:

                                    Try it out and see what you think. It's nice that the paint is very cheap for how much you get, so it's worth checking it out.

                                    Here are the pictures I posted before:

                                    Light Gray:

                                    Click image for larger version

Name:	IMG_1805.JPG
Views:	552
Size:	68.6 KB
ID:	93559

                                    Dark Gray:

                                    Click image for larger version

Name:	IMG_1804.JPG
Views:	571
Size:	82.1 KB
ID:	93560

                                    Comment


                                    • My Freewing A-10 90mm (using Freewing 12-blade fans with 1550kv outrunner motors) EDF jet is almost ready to go. I have to solder up the Freewing 130A ESC's and finish some small things here and there. Below are some pictures of the painting and weathering. I wasn't sure the weathering would look good. Right after its new paint job and shinny clean surface, it looked too much like a toy. The weathering toned it down well and looks more realistic now. The bottom of the jet is still gray on purpose for a little color contrast in hopes of improving orientation, although it doesn't necessarily need it in my opinion.
                                      Attached Files

                                      Comment


                                      • Originally posted by Pogo View Post
                                        For those of you going with the "shocks on the main gear" mod on RCG I just posted over there on my take on it:
                                        Originally Posted by mattmanraptor
                                        The shocks are 85mm long, body is 12mm diameter, Pictured: TrackStar Aluminum Shock Absorber Set 85mm (2) S160085 HK
                                        The silicone oil used(3 weights),,,, Shock oil 100wt, Diff oil 500,00cSt and 1,000,000cSt
                                        some 4mm and 5mm brass tubing
                                        Bolts: a 3x14mm button head and a 4x16mm hex head
                                        a 3mm tap
                                        I've expanded on Matt's brilliant idea a bit in order to improve the geometry of the shock and hence it's function. The triangle created by the bracket allows full stroke of the shock and no spacers were needed for the install as it's more in line this way. The bracket is from 1.4mm aluminum I had on hand, mounted with 3mm machine screws. Not too much foam and retract mount plastic needs removing with this configuration. I used the same shocks Matt sourced (thanks again man!) and they're filled with the 5000 diff oil- the dampening action feels good but as I've yet to fly this mod we shall see. I've only 5 flights on my Hog, all good landings, but a slight trough in our grass field is launching it on the take off run prematurely, ass high, into the air and I'm hoping this will reduce that. Not to mention the inevitable bounced landing that will happen at some point....
                                        Tom
                                        Great engineering Tom and Matt! Looks awesome.

                                        Comment


                                        • Great job T-Cat.. Now onwards with your favourite part.. Soldering..:)LOL

                                          Comment

                                          Working...
                                          X